Make a photo album with a clear story, readable pages and a lasting record
A good photo album gives the reader a route through an experience. It establishes who and where, makes room for the important moment, and finishes with something that feels earned. The task is not to fit the largest possible number of photographs into a book. It is to choose what each picture contributes.
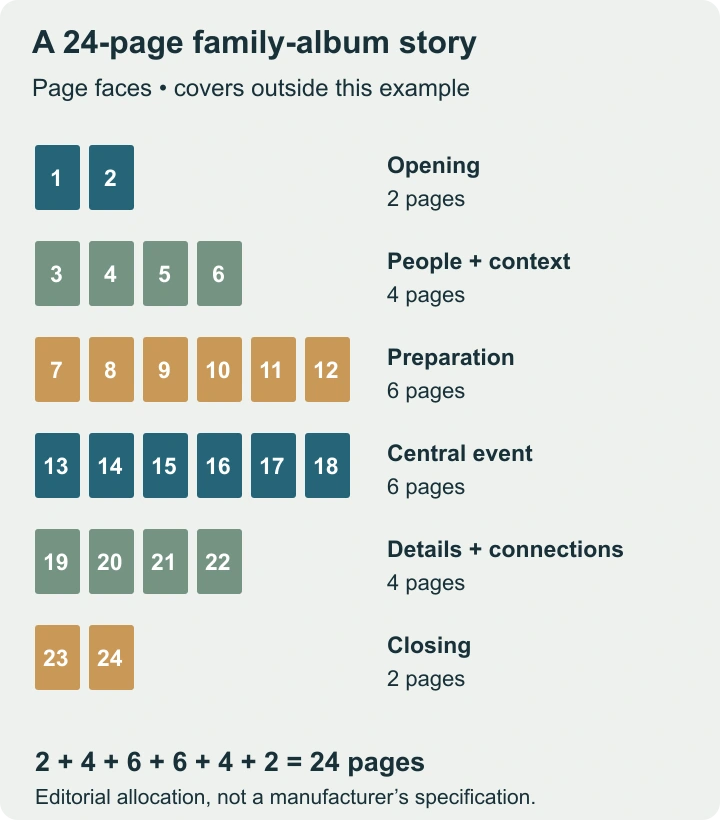
This guide develops a fictional 24-page family-event album from a larger photo folder. The page budget, image counts and layout choices are editorial examples, not Cypress product specifications or manufacturing requirements. Use the same method for a trip, anniversary, family history or other sequence, then adapt it to the book you actually plan to make.
Write a brief small enough to guide real choices
Before opening a layout file, finish three sentences: “This album is about…”, “Its main readers are…” and “After reading it, they should remember…”. For our example: a family reunion; relatives who attended and younger family members who did not; the people, the preparations and the afternoon they shared.
That brief resolves a common editing problem. A technically beautiful photograph of a table setting might be less useful than a slightly imperfect photograph showing a relative who appears nowhere else. Technical quality matters, but the album’s purpose decides what is essential.
Set an inclusion rule for sensitive or ambiguous material before making the final selection. For instance, privately ask whether a participant is comfortable with a particular photograph being included in copies shared beyond the immediate family. Do not assume that permission to take a picture settles every later use.
Edit in two passes: usable photographs, then useful photographs
In a constructed workflow, a folder of 120 originals becomes a contact sheet of 48 candidates and then a selection of 32 photographs. Those numbers describe this example, not an ideal selection ratio. Keep the originals even when a picture is excluded from the book.
The first pass removes accidental duplicates and files that cannot serve their intended role: perhaps the subject is obscured, the frame is unrelated, or a needed face is unreadable. The second pass asks a harder question: what would the reader lose if this photograph were absent?
| Picture role | Example in the reunion album | Reason to keep it |
|---|---|---|
| Establishing view | The house and garden before guests arrive | Orients readers who were not present |
| Introduction | A small group with names identified | Connects faces to the family story |
| Action | Preparing the shared meal | Shows how the event came together |
| Relationship | Two generations talking across a table | Communicates interaction beyond a posed lineup |
| Detail | A handwritten recipe used that day | Adds specific context |
| Closing view | Farewells or the quiet space afterward | Completes the sequence |
Three photographs of the same conversation may all be attractive. Keep all three only if they show a useful progression. If their contribution is identical, choose the strongest and give the recovered space to a missing person, an explanatory caption or a larger image.
Plan page faces before designing spreads
For this example, a page means one face in the book block. Covers and any production-specific endpapers are outside the 24-page editorial budget. Confirm how the chosen producer counts these elements before ordering or exporting.
| Pages | Allocation | Purpose |
|---|---|---|
| 1–2 | 2 pages: opening | Title, occasion and an establishing image |
| 3–6 | 4 pages: people and context | Introduce people and relationships |
| 7–12 | 6 pages: preparation | Show arrivals, practical work and anticipation |
| 13–18 | 6 pages: central event | Give the main gathering room to develop |
| 19–22 | 4 pages: details and connections | Include objects, quieter interactions and supporting memories |
| 23–24 | 2 pages: closing | End the story and record brief identifying information |
A section boundary is not automatically a spread boundary. Page numbering, left/right placement and the binding convention need to be checked in the actual template. The budget decides how much space a subject receives; it does not dictate a universal file-delivery format.
If the central event feels cramped, move two pages from the preparation section instead of shrinking every photograph. A page budget is an editing tool. It should respond to the story rather than force each section to have an equal number of images.
Use scale and sequence to make the album readable
Try laying out one representative sequence before designing the whole book. Begin with a wider scene, follow with an interaction and then show a meaningful detail. A repeated wide–medium–detail pattern is not a rule, but it can reveal whether readers have enough context to understand close views.
Compare two draft versions of a busy spread.
- Version A gives six photographs equal size.
- Version B gives the key interaction most of the space and retains two supporting views.
Ask a reader which moment appears important and which people they can identify. If both versions communicate the same story, the simpler one may provide more comfortable viewing.
Keep faces, essential text and irreplaceable details away from areas that may be obscured by the binding or trimmed. The exact safe area belongs to the producer’s template. A generic margin copied from another book cannot establish it.
A crop changes both the story and the usable pixel count
Suppose a 3,000 × 2,000-pixel landscape photograph must fill a 4:5 portrait frame. Keeping the full 2,000-pixel height leaves a crop 1,600 pixels wide. The crop contains 3.2 million pixels rather than the original 6 million: about 53.3% of the original area remains.
Printed at 8 × 10 inches, that crop provides 200 pixels per inch in each direction: 1,600 ÷ 8 and 2,000 ÷ 10. This arithmetic describes the available image data. It does not establish that the result meets a particular producer’s requirement or that the subject is sharp. Resampling to a larger pixel count does not recover detail absent from the original.
There is also an editorial cost. The portrait crop may remove the second person who made the interaction meaningful. Alternatives include using a landscape frame, reducing its physical size, selecting a different photograph or retaining empty space around it. Filling a box is not a sufficient reason to damage the story.
Write captions that preserve what is known
A useful caption identifies a person, place, date or relationship that the image alone cannot supply. “Lunch in the garden, June 2018” adds more than “A lovely day.” But precision should follow the evidence. If the month is uncertain, write “Summer 2018” rather than inventing a date.
For inherited photographs, keep three fields in a private working record: the proposed caption, the person or document supporting it, and any uncertainty. An example might read “Probably taken at the old family house; identification recalled by Elena in 2026; year unknown.” The published caption can be shorter while retaining the uncertainty.
Check names independently from visual design. A perfectly aligned caption with a misspelled name is still an error. Have someone familiar with the people review a numbered proof so that corrections refer to exact pages and photographs.
Keep the album and the source archive as separate assets
The Library of Congress recommends identifying and organizing digital photographs, describing them, making copies and storing copies in different places. Apply that principle to the project by keeping original files, the approved selection and the final layout distinguishable. Test that a backup can be opened; a folder name alone does not demonstrate that it contains usable files.
For physical photographs, the Library emphasizes careful handling and suitable protective materials. Handle prints by their edges with clean, dry hands, and avoid attaching irreplaceable originals with ordinary adhesive tape. If a print is stuck, damaged or fragile, do not force it into an album project; consider a conservation assessment and use a suitable reproduction when available.
Before handoff, review the sequence at reading size, confirm every caption, and check the producer’s requirements. The separate album handoff guide addresses file organization and delivery. Use the materials and swatches guide when comparing physical samples, and the Juniper Book guide for questions about that historical product page. A finished album should work both as a readable story today and as a well-identified record for someone who encounters it later.
Build the collection one decision at a time
- Sort Inherited Photographs Without Losing Their History
- Write Family Photo Captions That Preserve What Is Known
- Scan Family Prints for Albums: Capture, Resolution and Review
- Digitize Negatives and Slides With a Traceable Project Brief
- Choose Photo-Album Paper With a Useful Print Comparison
- Prepare Phone Photos for a Printed Album
- Plan a Family Yearbook That Includes Ordinary Life
- Make a Memorial Photo Album With Specific, Shared Memories
- Build a Travel Photo Album With Route, Scenes and Context
- Store and Handle Photo Albums With Proper Support